Last updated on 2015-10-06
Previous tutorial: Creating an OPM GEF Editor – Part 24: Showing Feedback to the User
One of the problems with visual programming languages is layout – you can stay endless hours just arranging the figures in the diagram without any real changes in the program, just to “make it look better”. This is a complete waste of time. For textual languages, it is a standard practice to have code auto-formatters that format the code every time you save. There are even some extremists who consider badly formatted code as having errors (if you are interested in the subject, there are programs like CheckStyle and Sonar to check coding standards, among others. If you use a good another tool and find it helpful, please leave me a note).
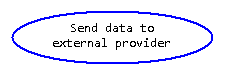
Anyway, my solution to this problem is simple: make the layout part of the language, so that it is not “secondary information”. This means that the developer cannot change the layout without changing the meaning of the program. And this also means that the language UI has to be very smart. For example, an OPP process is displayed as an ellipse, with the name of the process inside the ellipse. This could be shown in a number of ways:


![]()
So the developer has a problem – he has to decide how to resize his ellipse in the “best way” possible (which will definitely be different from the “best way” of all other programmers).
My solution: don’t let the programmer decide (at least not directly), but have each model element decide on its size, based on pre-defined configuration. It took me some days to get this to work, and I had to dig and debug the GEF Logic example a couple of times, but finally I managed. I needed to do the following things: 1. calculate how large is the text; 2. calculate the desired width of the the text using a pre-determined width to height ratio (See my question on ux stackexchange regarding this ration); and 3. calculate the final size of the text after resizing it to the calculated width. The last step is needed because the text may actually end narrower because we only want to have new lines when there is a break in the text (spaces, commas, etc.). Draw2d has a component that knows how to do this (called TextFlow) but I couldn’t manage to find a way to calculate the height… I tried to use getPreferredSize() on the TextFlow after setting its size, bounds, etc, but didn’t work. And then I found it: I had to pass -1 as the desired height to the getPreferredSize() method so it calculated it alone!
So now the solution is simple: calculate the size of the text in one line (using the TextUtilities class). Calculate the area that is used by the text and from this derive the desired width, using the width to height ratio. And last, ask the FlowPage to calculate it’s preferred size using this width and a height of -1. I created a new class that does just this:
package com.vainolo.draw2d.extras;

/*******************************************************************************
 * Copyright (c) 2012 Arieh 'Vainolo' Bibliowicz
 * You can use this code for educational purposes. For any other uses
 * please contact me: vainolo@gmail.com
 *******************************************************************************/

import org.eclipse.draw2d.TextUtilities;
import org.eclipse.draw2d.geometry.Dimension;
import org.eclipse.draw2d.text.FlowPage;
import org.eclipse.draw2d.text.ParagraphTextLayout;
import org.eclipse.draw2d.text.TextFlow;

import com.vainolo.draw2d.extras.translate.JDraw2dToDraw2dTranslations;
import com.vainolo.jdraw2d.HorizontalAlignment;

/**
 * A figure with a {@link TextFlow} that "smartly" calculates its preferred size,
 * using a provided width to height ratio.
 */
public class SmartLabelFigure extends FlowPage {
  private final TextFlow textFlow;
  private double ratio;

  /**
   * Create a new smart label with the given width to height ratio (width = ratio * height)
   *
   * @param ratio
   *          ratio to use when calculating the smart size of the label.
   */
  public SmartLabelFigure(double ratio) {
    super();
    this.ratio = ratio;

    textFlow = new TextFlow();
    textFlow.setLayoutManager(new ParagraphTextLayout(textFlow, ParagraphTextLayout.WORD_WRAP_HARD));
    add(textFlow);

  }

  public void setText(String text) {
    textFlow.setText(text);
  }

  public String getText() {
    return textFlow.getText();
  }

  public void setRatio(double ratio) {
    this.ratio = ratio;
  }

  public double getRatio() {
    return ratio;
  }

  /**
   * Calculate the best size for this label using the class's width to height ratio.
   * This is done by calculating the area that the text would occupy if it was in only
   * one line, then calculate a new width that would give the same area using the
   * width to height ratio, and finally it sends this width to the {@link FlowPage}'s
   * {@link FlowPage#getPreferredSize(int, int)} method which calculates the real
   * height using line breaks.
   *
   * @return A close match to the size that this figure should have to match
   *         the required width to height ratio.
   */
  public Dimension calculateSize() {
    Dimension lineDimensions = TextUtilities.INSTANCE.getStringExtents(textFlow.getText(), getFont());
    double area = lineDimensions.width() * lineDimensions.height();
    double width = Math.sqrt(area / ratio) * ratio;
    invalidate();
    return getPreferredSize((int) width, -1);
  }

  public void setHorizontalAlignment(HorizontalAlignment hAlignment) {
    setHorizontalAligment(JDraw2dToDraw2dTranslations.translateHorizontalAlignment(hAlignment));
  }
}
(Note: I’m using here some special classes that I am creating in order to port the draw2d project outsize of eclipse. I’ll write
more about this in a future post).
So there it is, now the programmer can’t resize the figures, not matter how hard he tries. And the size is calculated automatically.
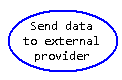
Using a ratio of 2, the example above looks something like this:
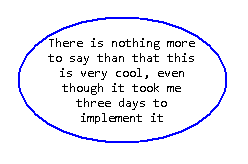
And here is another example:
The code for this class (and more goodies to come) can be found here and my new jdraw2d library (in progress) can be found here.
Update: the FlowPage stores a kind of “cache” of the last 3 saved layouts, so my implementation didn’t give the correct results sometime. Thankfully,
invalidate() clears this cache. The code was updated to mach this.
Next tutorial: Creating an OPM GEF Editor – Part 26: Activating Tools from the Context Menu
Please, make a tutorial for nodes with labels outside of nodes. I.e. OPMObject with label under or over it.
There are two ways to implement this:
If you have followed my tutorials, both implementation should be straightforward.
Hi,
One Question
He deployment in exercise this all page com.vainolo and running perfect.
Exists one example the implementation this example
Sorry, but I could not understand your question.
Hello : )
I have a question.
How can i change font size of textflow ?
I tried with the method [textflow.setfont] before I had changed height value of fontdata.
like this,
Font tFont = m_Textflow.getFont();
FontData[] tFontDataList = tFont.getFontData();
tFontDataList[0].setHeight(aSize);
m_Textflow.setFont(new Font(null, tFontDataList[0]));
But that didn’t work correctly and made any space on head.
Help me please T^T
No idea… never tried to do this. Did you try debugging the code to see what happens? You should also ask in StackOverflow.
Hey Vainolo,
I have small silly question. Could you please let me know where the main() for all the tutorials is ? Thanks in advance
This is an eclipse plugin, so there is no
main(). Start reading from the first tutorial and thing will surely become more clear.